

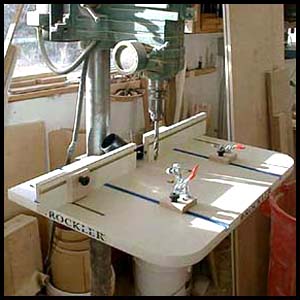
Rockler Drill Press Table
Review by Ted Whittenkraus
 For all of you
with short attention spans:I like it. Enjoy the pictures.
For all of you
with short attention spans:I like it. Enjoy the pictures.
If you're still reading you must be one of those cerebral types. I've heard there are woodworkers like that, though I've never met one personally. I'll do what I can to enlighten you further on this drill press table.
- Features I wish I'd thought of:
- split fence
- dust pickup hood
- 1" thick melamine MDF table
- horizontal thrust quick clamp
- hold down quick clamp
- aluminum T channel for quick clamps
- fence stop mounted in T slot
- fence mounted to table in T slots
- replaceable fence sections mount to table on aluminum angle bar.
- nice positive 90 degree mounting for the fence
- easily replaceable table insert under drill
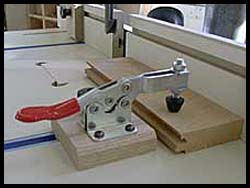 The two quick
clamps come in handy in their own obvious ways. You will on occasion
wish that they were a little closer to the action. This should
be quite easy to do by replacing or adding on to the oak mounting
blocks. A word of caution, get too far from the aluminum channel
and the force of the thrust will multiply through leverage to
destroy the channel.
The two quick
clamps come in handy in their own obvious ways. You will on occasion
wish that they were a little closer to the action. This should
be quite easy to do by replacing or adding on to the oak mounting
blocks. A word of caution, get too far from the aluminum channel
and the force of the thrust will multiply through leverage to
destroy the channel.
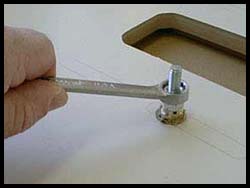 Most of the
woodworkers I know (read "real men") never read any
directions. The folks at Rockler seem to know this about us and
have only included one direction, which boils down to "Mount
the table to your drill press". There are two threaded posts
and two brass inserts to do this with. Suggestion: Don't rely
on the slots in the inserts to drive the post into the holes
you drill in the table bottom. Use two opposing nuts on the post
and a wrench.
Most of the
woodworkers I know (read "real men") never read any
directions. The folks at Rockler seem to know this about us and
have only included one direction, which boils down to "Mount
the table to your drill press". There are two threaded posts
and two brass inserts to do this with. Suggestion: Don't rely
on the slots in the inserts to drive the post into the holes
you drill in the table bottom. Use two opposing nuts on the post
and a wrench.
 The recess for
the replaceable insert is routed out at 29/64". Seems like
an odd depth but when I checked a few pieces of Baltic Birch
ply that were laying around the shop I found that they were very
close to this dimension. Coincidence? You be the judge. For my
part I much prefer planing my own solid hardwood down for replacement
inserts, so whatever the depth is should be no problem. I made
a years supply of inserts in 20 minutes out of a few scraps so
I won't even think about this subject again for a while.
The recess for
the replaceable insert is routed out at 29/64". Seems like
an odd depth but when I checked a few pieces of Baltic Birch
ply that were laying around the shop I found that they were very
close to this dimension. Coincidence? You be the judge. For my
part I much prefer planing my own solid hardwood down for replacement
inserts, so whatever the depth is should be no problem. I made
a years supply of inserts in 20 minutes out of a few scraps so
I won't even think about this subject again for a while.
 The split fence
is really the Bees' Knees! The two fence sections adjust quickly
along the aluminum bar to increase or eliminate the gap. Many
times I've needed to cut part of a hole on the edge of a wide
board. Setting up this task took 1/2 the time I normally spend.
The split fence also allows for the dust pick up hood. I'll probably
use this feature most when drilling MDF (yucky stuff to breath).
The split fence
is really the Bees' Knees! The two fence sections adjust quickly
along the aluminum bar to increase or eliminate the gap. Many
times I've needed to cut part of a hole on the edge of a wide
board. Setting up this task took 1/2 the time I normally spend.
The split fence also allows for the dust pick up hood. I'll probably
use this feature most when drilling MDF (yucky stuff to breath).
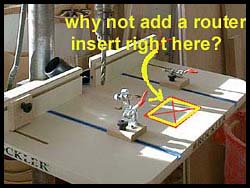 One major improvement
I will suggest. Add the capability for using this as a router
table as well. This won't work for every one. Your drill press
has to be heavy enough (or bolted down) to provide stability.
You will also need to modify the fence mount to allow it to slide
further forward on the table. See below.
One major improvement
I will suggest. Add the capability for using this as a router
table as well. This won't work for every one. Your drill press
has to be heavy enough (or bolted down) to provide stability.
You will also need to modify the fence mount to allow it to slide
further forward on the table. See below.
 This is the
view from the back. To add the router table feature I will drill
an extra pair of holes in the bar right over the aluminum T channel.
Or you could extend the slots that are cut through the table
which are provided for fence mounting/adjusting.
This is the
view from the back. To add the router table feature I will drill
an extra pair of holes in the bar right over the aluminum T channel.
Or you could extend the slots that are cut through the table
which are provided for fence mounting/adjusting.
Over-all, I give the Rockler Drill Press Table high marks for quality, simplicity, and functionality. Address all praise for this review to Ted@CustomMade.com. Chuck or Jim will handle complaints.
Ted Whittenkraus
CustomMade.com
More details about the Rockler Drill Press Table can viewed at Rockler's website