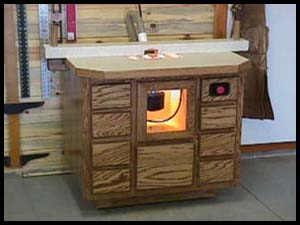


by Joe Johns

D iscussion
on the woodworking list at The Oak has basically covered everything
you ever wanted to know about router tables but were afraid to
ask. And so, what prompted me to write this article? Well, there
was general chatter about which router - fixed or plunge - worked
best mounted in the table, some friendly bantering as to whether
or not a vacuum port should be in the router area and whether
to buy or build. Indeed, it appeared that some folks were about
as vague on router tables as most woodworkers are on nuclear
physics.
So, in an effort to assist those wishing to build a better router
table, I decided that it wouldn't suffice to just write an article
about it, but that I had to actually build the
table and document the project with pictures. The anal types
will note the classification, based on the construction techniques,
should be labeled as a cabinet and not a "table". Technically
they'd be right, but since the traditional terminology is router
table, that is what I'll call it.
T he best place to start, I suppose, is to determine the need for a router table. Quite simply, if you have a router then you need a router table. A table allows the woodworker to perform operations that would normally be virtually impossible without one. Since the purpose of this article deals with building one rather than the how-to and/or uses of a router table, I'll leave the reader to their own devices in finding this information. However, I will point you in the general direction of Patrick Speilman, perhaps the most well-known authority on the router; his books on the subject are quite extensive.
N ow that the issue of need has been resolved let's cut to the chase and start making your new router table....
The size of the tabletop for a router
table shouldn't be much greater than 2' x 3' therefore the size
of my carcass was 21" d. x 33" w. while the height
should be determined by the user (my basic carcass is 30 1/4"
from the floor but add the tabletop and the feet, the overall
height is 32 1/2").
This dimension allows the counter top to extend past the carcass
by 1 1/2" on three sides and 4" on the front, providing
for easy clamping of jigs and accessories. The size shouldn't
be much less than this either because of the work you can expect
to perform at the router table. I've seen them larger and smaller
but this size has always been my favorite.
Just like the workbench, the router table's height should be where you can stand comfortably over it while work is being performed. This is also a safety issue because being able to see exactly what is going on while using the router table should be of paramount concern to the operator.
 The actual dimensions
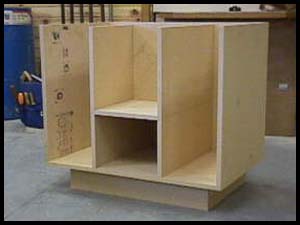
of this carcass are 20 1/4" d. x 33" w. x 30 1/4"
h.
![]() 4 partitions - 19 3/4"
x 24 3/4"
4 partitions - 19 3/4"
x 24 3/4"
![]() 1 intermediate shelf - 11 1/2"
x 11 3/4"
1 intermediate shelf - 11 1/2"
x 11 3/4"
![]() 1 intermediate back - 11 1/2"
x 14"
1 intermediate back - 11 1/2"
x 14"
![]() 1 bottom - 19 3/4" x 33"
1 bottom - 19 3/4" x 33"
![]() 1 back - 25 1/2" x 33"
1 back - 25 1/2" x 33"
![]() 2 toe-kick - 4 3/4" x 26
2 toe-kick - 4 3/4" x 26
![]() 4 toe-kick - 4 3/4" x 18 1/4"
4 toe-kick - 4 3/4" x 18 1/4"
I made the toe-kick 4 3/4" high
so that by the time the face frame is placed onto the carcass,
the resulting space between the bottom of the face frame and
the floor will yield 3 1/2", which is pretty much standard
for a toe-kick. I also allowed the toe-kick to surround three
sides so that a person can stand comfortably anywhere around
it.
The toe-kick and the carcass are made entirely from particleboard.
The hole for the dust collection port in the router compartment
is drilled at a point centered on 5 3/4" from the left and
5 7/8" from the front of the intermediate shelf. It is advisable
to drill or cut this hole before you assemble the carcass. Make
this hole big enough so that the large end of the 3" PVC
adapter fits tightly. Strike your lines on the bottom and back
where the partitions will sit then glue and staple (or screw
or nail or whatever) the carcass and toe-kick assembly together.
I wouldn't recommend gluing the toe-kick assembly to the bottom
of the carcass because you may have to remove it at some point
in the future. The intermediate back sits on top of the intermediate
shelf so that 7 1/4" lies in-between the back and the intermediate
back.
 Face frame cutting list
(stiles are vertical, rails are horizontal - I used Red Oak because
of its hardness but use what you wish)
![]() 2 outside stiles - 2"
x 26 3/4"
2 outside stiles - 2"
x 26 3/4"
![]() 2 inside stiles - 2" x 22 3/4"
2 inside stiles - 2" x 22 3/4"
![]() 2 outside rails - 2" x 29 3/4"
2 outside rails - 2" x 29 3/4"
![]() 6 drawer rails - 2" x 7 1/8"
6 drawer rails - 2" x 7 1/8"
![]() 1 shelf rail - 2" x 11 1/2"
1 shelf rail - 2" x 11 1/2"
Assembly of the face frame is straightforward, however be sure that the shelf rail is 12" down on the center stiles and the drawer rails are 4 3/16" apart. If the carcass was assembled correctly, the inside edges of the center stiles will be flush with the center partitions and the shelf rail should be flush with the shelf.
The face frame will probably get your
vote as the section most likely to make you set your hair on
fire. This is because of the number of pieces all needing to
be glued and set into their proper places all at the same time.
But, if you work on it with a plan and don't get excited, you'll
adapt and overcome.
With this particular glue-up, be sure to have your clamps at
the ready. I used polyurethane glue, which has about the same
working time as regular yellow carpenter's glue, because I like
the way it expands as it cures. Use whatever glue you feel comfortable
with. A biscuit jointer could also be used but since strength
within the frame isn't necessary, it would really be overkill
and make assembly that much more hectic. I used 7 clamps and
glued the entire assembly together at the same time. Once the
face frame is assembled and in clamps, set it aside to cure.