
The concept of a router table is such that when you 'throw the switch' the router starts and also turns on the vacuum system. Basically what occurs is the switch sends power to an outlet where the router and vacuum are plugged into.
I wanted a light inside the router compartment that would either come on when the router was started or when the door was opened. So, I went to my favorite shopping mall and liberated a micro switch from some electronic gizmo and the light fixture from a discarded freezer. The light is just about the nicest feature of this router table. It not only allows you to see what you're doing when changing bits but when in use, there is surprising clarity, as you look down onto the rotating bit. I believe the best location to mount it is directly behind the router and as close to the tabletop as possible.
This part of the project was the most fun for me as it allowed me to be imaginative in keeping the wires tucked neatly away. Under normal circumstances I'd provide instructions and a photograph, but due to liability issues, I will not advise how to go about wiring your router table. If this is something you're not comfortable with then I suggest you seek the help of a friend or professional. Books on wiring are available from your local library or the WEB. I will suggest that you NOT use a standard household light switch. These switches are too easy to toggle on and the amps involved can be a fire hazard - use a panic type switch where you have to pull it out to activate it but merely hit the paddle to turn it off.
 The fence is another one
of those areas that can be classified as "user defined."
The router table that Uncle Norm made some time ago had quite
the elaborate fence system but the greatest problem I had with
it was how it attached to the top. I didn't like where slots
were cut into the top that allowed the fence to slide perpendicular
to the bit. To my thinking, a slot in the top weakens it, so
I came up with a different way to hold the fence tight to the
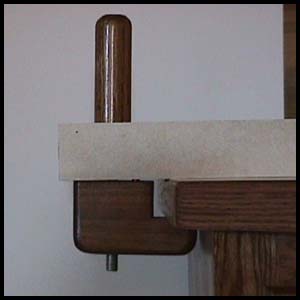
top. The picture to the left shows the underside of the fence
and that each end has three holes drilled into it. The two outer
holes accept the guide pins of the clamp block. As the knob is
tightened the clamp block is pulled up on the guide pins. These
pins are 5/16" steel rods that are glued in the blocks.
 The through rod is 1/2"
all thread and a nut is recessed into the bottom of the clamp
block. The handle has about 1 1/2" of the all thread passing
into it with a hole drilled horizontally through the handle and
all thread. A pin is then inserted into the hole and glued in
place - this keeps the handle from spinning on the all thread.
The "vee" on the underside of the fence acts as a venturi for the dust collecting port. I made my whole fence a single piece because I didn't see the need to have a split fence.
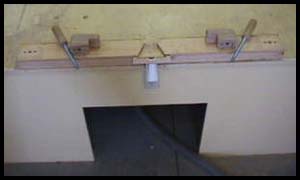
I made the top so that 4" protrudes over the front of the table and 1 1/2" over the remaining three sides and the front two corners were clipped 45 degrees (see the photo at the beginning of this article). So, the tabletop's final dimensions were 25" x 36". Particleboard was used for the substrate and plastic laminate was used for the covering on the top and fence. The edges are 4/4 Red Oak.
I don't believe a miter gauge slot needs to be in a router table so that's why one isn't found on mine.
The MTO (material take-off):
2 sheets of 3/4" particleboard (carcass and tabletop)
1 sheet of 1/2" particleboard (carcass back and drawer components)
1" x 8" x 8' Red Oak (or whatever)
1 piece Plexiglas 8 3/8" x 9 1/2"
4 hinges
1 light socket
1 micro switch
wire
1 plumbing kit as described above
7 sets of drawer slides
36" x 48' plastic laminate (tabletop and fence)
panic-type switch
The router table will be perfectly content
sitting on its toe-kick, however if you made it from particleboard
then you'll have to take care when moving it around. Particleboard
isn't too strong on the edge and will be susceptible to chipping
out when it's moved across the floor.
I overcame that obstacle, once again, by going shopping at my
favorite mall. I liberated some steel supports that are commonly
found on commercial kitchen appliances (you know the ones - they're
about 5" long, have a height adjustment and have a bolt
stud at the other end that screws on and they're tapered?). I
welded a nut onto a steel plate and screwed it onto bottom of
the carcass then attached the legs. After they were attached,
the toe-kick ended up being elevated about 1/2" off the
floor, providing a nice shadow line and hiding the existence
of the legs.
The drawer fronts and doors are 1/2" overlay. This means that they are 1" wider and taller than the actual drawer or door opening in the face frame.
I used the European type hinges by Blum.. They are 110 degree opening and are the screw type, not the dowel type. If you use these you'll need a 35MM hinge boring bit (available where you buy the hinges) and the mounting plates (be sure you order them for 1/2" overlay). I really like these hinges because they are hidden, they operate extremely well and are reasonably priced when you buy them in bulk ($1.53 each).
I used 3/8" acrylic for the plate that my Porter Cable, fixed based, 3-1/2HP router is mounted to. The proper location of this plate in your top is critical in that the center of the plate must be in the center of the router compartment and the center of the router mounted to the center of the acrylic plate. I suggest you temporarily clamp the top to the carcass and use a plumb bob to locate the location of the top in relation to the center of the dust collection port in the router compartment.
One thing I didn't touch on was the actual router bit holders. Because there are seven drawers in this table, there is plenty of room for all sorts of router-related accessories and bits. Again, I feel the method of how you display the bits in each drawer to be user defined; this will give you something to putz around with. If you decide to build this cabinet and feel you've come up with something snazzy, I'd like to hear from you. If you have some questions just send an Email to me, Joe Johns.
I trust you'll enjoy building your new router table as much as you'll enjoy using it. I had a jolly nice time putzing around with mine - the shopping trips to the landfill aside - because I was able to incorporate ideas I've been thinking of since I built my previous table 6 years ago.
Thanks go out to the webmasters at the Woodworkers Website Association, Chuck Ring and Jim Mattson, for placing this article at the Gazette.
No part of this article or its pictures may be used
elsewhere without the permission of the author.
Editor's note: Any questions about the Router Table for Woodworkers should be directed towards the designer, Joe Johns.