

Stots Dovetail Template MasterTM by Doug Smith
 I've got a lot to say about
this dovetail template but let me mention Richard Stottmann first.
He's the innovator behind Stots
Corporation. This fellow is a woodworker just like you and
me. He has faced problems which have arisen in his work, thoughtfully
figured them out and now he shares them with us. I read the inside
cover of the manual, and got a glimpse of his personality in
his P.S. concerning lawyers. Then there was his Honor Statement
on the inside back cover... this guy just wants everyone to be
able to cut dovetails, cheaply, and correctly! I'm thinking that
his business is just an offshoot from that, at least those are
my thoughts on it. I like him!
I've got a lot to say about
this dovetail template but let me mention Richard Stottmann first.
He's the innovator behind Stots
Corporation. This fellow is a woodworker just like you and
me. He has faced problems which have arisen in his work, thoughtfully
figured them out and now he shares them with us. I read the inside
cover of the manual, and got a glimpse of his personality in
his P.S. concerning lawyers. Then there was his Honor Statement
on the inside back cover... this guy just wants everyone to be
able to cut dovetails, cheaply, and correctly! I'm thinking that
his business is just an offshoot from that, at least those are
my thoughts on it. I like him!
The Instruction Book
This is 30 pages of very clear, concise instructions. Starting
at an Anatomy of a Dovetail Joint through a troubleshooting section,
Mr. Stottmann leaves nothing out. His section on making a working
jig are exemplatory and it doesn't stop there - knowing all woodworkers
aren't the same, he gives you a second option in Method 2 which
builds upon the 1st.
In both these Methods, you have options of 1" spacing or 2" spacing. I chose Method 2 with 1" spacing as this seemed the best setup for me. My dovetails were to be in 10 drawers for two chests which I'm building. (I also figured that I could go to 2" spacing if I chose to.) Following his making of the working jigs comes the test cut, and how-to section. These pages are followed up with adjustments - how to fine tune for that perfect joint.
Once again, he spells it out so all can understand and then accomplish this with no fuss. Next we're taken through the joints the Dovetail Template Master can do: half blind, (more on this joint later) through dovetails, angled dovetails, box joint and hinge joint. By the time the working jig is done, you already have a handle on what you're doing; these sections just reinforce your knowledge. You're all set, great instructions!
 Making the Working Jig
Having read the instructions you see the simplicity of Mr. Stottman's
system... you're using his jig to fashion your own so when you
mistakenly, (oops, Dang it #%@*) route it, not all is lost.
I picked MDF for my working jig, and decided on 1" spacing. I also went for Method 2, which gives you a jig twice as long, but not in sections. (if you make a mistake, you replace the whole thing, careful Doug!) Since the 2" spacing is arrived at by deleting every other 'bar' in the jig, I thought that I could retrofit that way but couldn't add them back without making another jig.
In the instructions, he says to screw the template down. I'm saying, 'Make sure its SECURE!'. There is a lot of force when you're routing this out. (This might be where MDF, notorious for its lack of screw holding ability is not the best choice. Stottman lists Plywood or solid wood - I didn't want to risk any voids.) You also make a backer board that's 2-1/4" wide. To get this laminated thickness ply will not work, its undersized, make sure of your thickness here if gluing up. I once again chose MDF, 3/4" thick to glue up - a straight forward operation. Attach your backer to the working jig at right angles and you're ready for a test cut.
Test Cuts, and Alignment
Here is where you'll be switching back and forth between your
dovetail bit and straight bit, as you do the one time only tune
up. Its all listed in the instructions, move the working jig
in relationship to the backer board one way if they're too tight,
the other way if they're too loose. On the third try my test
tail board fit my pin board perfectly! Then you're all set, no
need to test again. Alignment of the pin board is done as a relationship
of the tail board.
This might be the only awkward part. You scribe the tail locations onto the end grain of the pin board, then align with the fingers of the working jig. This, however, harkens to the methods used in hand cutting dovetail joints, so its not all bad. When doing multiplies, time can be saved by clamping stops to the backer board.
 Making the Cuts
The Stots system is like other dovetailers; its a template system
for router bits. I got bearings for my bits instead of a template
guide bushing. All you do is follow the template guide, which
you create from the master jig, with the appropriate bit. It's
best to organize all your pin boards and tail boards and then
mark their orientation prior to cutting. With a set spacing,
(in my case 1") if you have different height drawers you
will find that if you work from the center out, you will not
always have the same start, either a tail or a pin.This could
interfere with the bottom groove so try to plan ahead for your
spacing.
Once you're organized, its just a matter of making all your tails
first with the dovetail bit and then changing over to your straight
bit for making all your pin cuts. In between you need to mark
your pin boards for clamping to the template. The alignment is
always right on, due to the test cuts mentioned above, and bit
height is easy to set also leading to stacks of ready-to-assemble
dovetailed parts.
Half Blind Dovetails
This is probably the only place
I disagree with Mr. Stottmann. The instruction book says to make
the half blind joint from 2 boards: a regular pin board and an
"appearance" board. It recommends gluing the appearance
board to the pin board, to cover the end-grain of the tails.
An example would be a 1/2" pin board, and a 1/4" appearance
board, totaling 3/4".
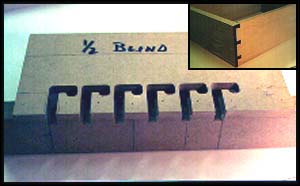 This seemed to me a too
round about way to make this very necessary drawer joint. Taking
a bit of my time and using the idea behind the Stots jig, I fabricated
my own template to cut this joint. This home fabricated jig is
based on 2" spacing and cuts with only 1 bit - the dovetail
bit. In it, like other half-blind dovetailers, the pin and tail
board are cut at the same time. The tail board is clamped vertical
and the pin board is clamped on the other side of the jig, in
a horizontal position. The bearing bit follows the template in
a J shape, routing the opening for the pin and then the
recess for the 2" tail.
This seemed to me a too
round about way to make this very necessary drawer joint. Taking
a bit of my time and using the idea behind the Stots jig, I fabricated
my own template to cut this joint. This home fabricated jig is
based on 2" spacing and cuts with only 1 bit - the dovetail
bit. In it, like other half-blind dovetailers, the pin and tail
board are cut at the same time. The tail board is clamped vertical
and the pin board is clamped on the other side of the jig, in
a horizontal position. The bearing bit follows the template in
a J shape, routing the opening for the pin and then the
recess for the 2" tail.
I gained a lot of respect for Mr. Stottmann while fiddling with
this cobbled together template. I was impressed with his thoughtfulness
and patience in devising and bringing to market a dovetail template
of reasonable cost. One has to do a lot of head scratching to
get things just right!
Reasons To Buy
I would recommend buying this template for a number of reasons.
But first, let me explain how I had previously done dovetailing.
I don't do a great deal of dovetailed drawers or case pieces
so I would either hand cut or use a combination of band and table
saws, along with chisels to get this desirable joint. And since
I don't do many, they were slow and real labor consuming.
Now, with Stots Corp's jig, I can cut dovetails in various thickness
material and get perfect results. It is very systematic, able
to handle multiples with ease and you can vary the dovetail spacing
to suit your style. And you can do this and spend way less than
other template jigs! I also like Mr. Stotman's approach; I think
using a little of your own ingenuity, you can develop the system
to your very own specs. A heartily recommended buy!
Editor's note: Doug Smith is a professional woodworker and webmaster. His homepage is packed full of interesting woodworking information.
The Dovetail Template Master is available for $39.95 from Stots Corporation.