

The Vac-U-Fence
A Tool Review: By Bill Britton
 Got lucky! I was setting
at the computer late one Thursday afternoon when up pops the
little window box saying I had mail from Chuck Ring. The message
was "Tool/Accessory Announcement". About 30 seconds
later, my bid for the Vac-U-Fence system contributed by the inventor
and manufacturer, Rudy Ramirez, (photo left, from the video)
was on its way.
Well for once I beat the rest of the WWA membership to the punch and was awarded the Vac-U-Fence system for evaluation. Having only a vague idea of what it was that I had spoken for and truly hoping that I'd not just stepped in a fresh pile of cow, I dialed up the Url (http://www.vac-u-fence.com/) and this is what I found.
The Vac-U-Fence is a table saw fence designed to hold a piece of stock to the fence by way of vacuum. In essence, you plug your shop vac into the fence which has strategically placed holes drilled into its face. The suction from the vac through the fence holds the wood firmly to the fence as it is pushed through the cut.
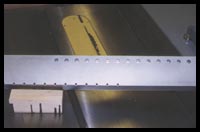 The aluminum fence is 2"
wide by 3" tall by 40" long and is designed to attach
to any professional or standard fence. It has two sets of holes.
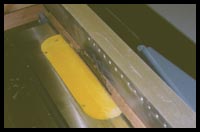
(picture left) The larger set of holes are located 3/8"
above the bottom of the fence and are to be used when cutting
3/4" or thicker material. The smaller holes are located
very close to the top of the fence. When the fence is flip-flopped
they become the bottom holes and are used when cutting thinner
stock.
Now that I knew what the Vac-U-Fence was and the concept under which it functioned, I was anxious to give it a try. I also would admit to being more than a bit skeptical at this point. My saw is the special edition Unisaw equipped with a 52" Unifence. It was my opinion that the Unifence was just about the perfect fence system and would be hard to improve upon.
The Vac-U-Fence arrived on the 3rd of July. My kids were coming for the holiday weekend so I'd only a couple of hours to install the new toy and see it work. The box contained four little plastic gizmos for stopping the square holes and inserting the vaguely familiar looking plastic wand. The fence itself was a nice, solid feeling piece of aluminum with a T-slot for attaching to my existing fence clamp. There was also one page of instructions which provided not a clue to proper installation. Clearly, I was on my own.
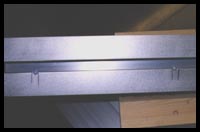 I could figure out the
plastic and my Unifence clamp slipped easily into the T-slot
of the new fence. The only problem was that the fence would not
clamp down to the table. Obviously, the lips of the T-slot were
preventing the fence from rising high enough to clear the saw
table. Pressed for time, (being an accountant with little mechanical
aptitude had nothing to do with this) out comes the Dremel tool
and two minutes and two little half moons later(see picture 2)
it was a perfect fit. The Vac-U-Fence now glided effortlessly
across the table.
Finally, the accountant's mind began to function and it occurred to me that if I were to be able to use the little hole side of the fence for thinner material, two more little half moons would have to be cut in the opposite opposing end of the fence. Further, if I wanted to use the fence on the left side of the blade, two more sets of half moons would be necessary. Last, if I wanted to slide the fence back to use as a stop block ( one of the most useful features of the Unifence) then both lips of the T-slot would have to be reduced. With apprehension, I eyed an old carbide tipped blade hanging on the wall. I hated to try it but was willing to do whatever it took! Well, no time now. My kids had arrived so I put it away for the weekend.
-2-
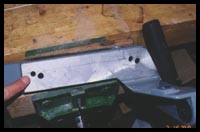 The day the kids left the
mailman delivered a video tape from Rudy Ramirez. I plugged it
in and watched Mr Ramirez put the Vac-U-Fence through its paces.
Pretty impressive watching the expert. At the end of the tape
Rudy explained the installation on the Unifence and the gadgets
used to attach other brand fences. Needless to say, I was most
embarrassed but very thankful that I had not butchered this tool
further. Installing the Vac-U-Fence on the Unifence clamp was
a simple matter of drilling two new holes in the Unifence Clamp.
(picture left)
Once installed (took only a few minutes with instructions) the next step was to find suction power. Two old shop vacs I use on sanders and the chop saw proved to be inadequate for the job. Minimum requirements for the Vac-U-fence are a 11 amp vacuum with 12 to 15 amps recommended. Out comes the house vac. With considerable help of some duct tape, I'm finally in business.
I begin to make a few tentative test cuts like those shown in the video. I sliced up some scrap MDF, cross cut and ripped some plywood, and straightened an 8' oak board. Finally, I put it to the test I'd been waiting for, cutting some really thin slices. I make a lot of small boxes between furniture jobs and use a lot of 1/8" material for inlays, keys, and slides, etc. Always before I had to make these small cuts on the outside of the blade resulting in inconsistent thicknesses.
 |
 |
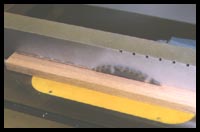
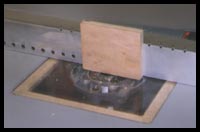
| Now I made the cut to the inside of the blade. It worked beautifully! I could even walk away from the saw to take the picture. | I resawed a piece of 1/4" stock resulting in two nice little 1/16" slices, one on each side of the blade with no burns or saw marks. This thing really works! |
 |
My big router hangs in my saw extension table for the express purpose of being able to use my tablesaw fence. The next test, of course, had to be as a router fence. Again, the results were great. I cut grooves, mortises, and rabbits, all with the same satisfying results. |
-3-
Well, enough playing around. The real test would be how the fence functioned under real work conditions and I had a small cabinet job in the waiting. I began by slicing up the plywood panels from 4x8 sheets. What a pleasure! Just line it up and push it through. No binding or burning. Then I ripped the rails and styles for the doors and ripped face plate material. I cut dados and grooves alternating between the router and table saw. I worked it hard and on every task it out performed the Unifence noticeably.
By day's end I noticed I was not getting enough vacuum from the 12 amp Sears house vac, especially with the small hole side of the fence. I had started with a new bag but the day's work had sucked enough fine dust into the house vac to reduce its efficiency. The next day I trotted down to Sears and bought their biggest and best, a 16 gallon, 6hp Craftsman shop-vac.
First off, the big Sears vac has a 2 1/2" hose so I bought a reducer to bring it down to a 1 1/4" opening. This left me with two male ends and I could not find a coupler in town. Then I remembered where I had seen that connecting wand which came with the Vac-U-Fence. It was made by Royale and was identical to the one on an old Dirt Devil canister vacuum cleaner that had been sitting in a back closet for several years. Not only did I now have spare parts, a few minutes with the band saw on one of the wands and I had a coupler and bingo - back in business. Now there's a new problem. That Sears Vac is so loud it completely drowns out the sound of my air compressor which was certainly bad enough in its own right. I truly cannot turn it on without wearing ear protection.
I've now used the Vac-U-Fence for about a month and have pretty much gotten use to the routine. First put on the ear muffs, turn on the vac, and last, turn on the saw. When powering down, reverse the order of events or risk a few arrows through the wall. I used the fence pretty hard during the month, at least for me. I did the cabinet set, a production run on boxes, and a desk and book shelf set now in the assembly stage. The fence and the concept are excellent but I did notice a few little negatives that should be mentioned.
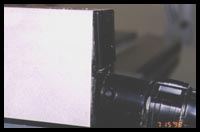 First, are those little
plastic gizmos that plug the ends of the fence and provide the
round connector for the vacuum hose-to-fence connection.(see
picture) They are pretty flimsy and the weight of the vacuum
hose tended to pull them out. My prediction is that they will
have to be replaced periodically. Along those same lines, the
problem I had in adapting the vacuum hook-ups needs to be solved.
Of the four vacs I tried none of them would have hooked up satisfactorily
without a coupler which I was unable to buy. The only other problem
I encountered with the fence was a sharp edge where the small
holes were drilled into the fence. A well callused thumb came
away with a pretty good cut causing me take an RO sander and
chain saw file to soften those edges.
-4-
The Vac-U-Fence seems a bit pricey at $160 and $175.50 (colored) as an add on feature to an already expensive fence system. Add to that the cost of a dedicated shop vac and you have quite an investment. Had I not had the opportunity to try it out in a real work situation, I probably would not have paid the price. Now that I have it, I wouldn't give it up at any price. Not only does the Vac-U-Fence greatly enhance safety, it significantly increased the performance of my Unisaw. Delta would be very wise to make a deal with Mr. Ramirez. The Vac-U-Fence should come standard on every new saw.
Check out the website at http://www.vac-u-fence.com/ or better yet order their video for $9.95 and watch Rudy put it through its paces. You'll be pretty impressed and it will greatly assist in installing the new tool.
My thanks go to Mr. Rudy Ramirez for contributing the Vac-U-Fence to the WWA and thanks to Jim and Chuck for letting me be one of the members to do the evaluation.
Respectfully submitted,
Bill Britton
Editor's Note: We had two takers for the Vac-U-Fence, so Mr.
Ramirez generously offered the WWA two units for review. The
following are the thoughts of Joe Johns, our other reviewer.
An Innovative Twist On The Standard Table Saw Fence by
Joe Johns
Not long ago I was selected to review the Vac-U-Fence (VUF) system. This system utilizes a standard vacuum cleaner that is coupled into an extruded aluminum fence, providing an otherwise old method for securing something into a new method adapted to hold wood material being cut on the table saw.
The fence is divided in half by it's length, essentially two separate tunnels, into which two entirely different series of holes are drilled into it's face side where each of these 'tunnels' perform two entirely different functions. The vacuum that is drawn through these holes is capable of providing a holding force - of any material being cut - against the fence that is unequaled by any other conventional means. By this, I mean that feather boards, hold downs, etc., however effective they may be, are not in the same league with the VUF.
The amount of time involved with the concept of the idea and then following through with it's development, attests to the usefulness of this shop accessory. However, this isn't to say that without it you will not be able to perform any woodworking, just that with it, in certain circumstances, you'll be able to make certain cuts more efficiently and safely.
Initial Thoughts
I must admit that after first receiving the system I was rather skeptical, especially having not yet received the video describing it's attributes. Prior to this, the limited documentation that came with the system revealed my having to drill holes in my current fence in order to use it. I'm sorry, but this was something that I was not prepared, nor willing to do because my Biesemeyer fence was perfect the way it was and I wasn't about to alter it with a couple of drilled holes.
According to the instructions, the holes would accommodate two bolts that would accept two plates, which would ride in a track of the VUF, whereby two knobs would then secure the VUF to my existing fence. In theory it appeared to be a viable option but in practice it isn't very sensible because doing so throws off the measuring capacity of the existing fence by forcing one to increase a measurement to account for the added fence.
According to the video, the VUF's inventor was using a Uni-Fence frame (actual Uni-Fence was removed) but nothing was mentioned about whether or not measurement variations had to be allowed while using the VUF as opposed to the Uni-Fence. Further, I felt that some mention in either the instructions or the video should have addressed the issue in detail since most people would share the same questions and feelings as I. Further, from all apparent, this is something meant for the user to work out for himself and if this is the case, then the delineation markings on these types of fences will have to be accounted for while using the VUF.
I never got that far because I adapted the VUF to work on my fence in order to follow through with this review, but yet not having to drill holes in my fence....it was, at best, your basic home-boy jury-rig, but it sufficed. I merely used the fence as it was meant to be used and did not consider any accuracy to be part of the test. In other words, I just clamped the VUF to my fence and made cuts according to what I thought was necessary in order to make this review.
The Cost
Around $160.00 depending upon where you purchase it. If
there are any accessories, I am not aware of them, however it
comes with a 1 1/4" vacuum hose adaptor, two closed plugs
and two open plugs, two knobs and two adaptor plates. There
are also many colors available (the video showed six).
Fit & Finish
Extremely impressive! The knobs were generic but the extruded fence was top notch and the adaptor plates were coated nicely. The documentation left something to be desired but this will probably be worked out as the future as this product evolves.
The Function
The idea behind this fence is two-fold (remember there are two
tunnels that are linear to the fence), first you have a section
where holes are drilled 3/8" from the bottom and the other
section has holes drilled diagonally into the corner of the other
tunnel. In effect, the latter provides a holding force
for smaller cut-offs while the former provides the force for
normal cutting.
Think of it this way; if you were cutting 1/4" x 1/4" strips, then the first one wouldn't do anything for you but since the second one has holes drilled diagonally from the corner, then the holding force is still there. In this case, all you have to do is flip the fence end-for-end to achieve this capacity and since the slot behind the fence is equidistant, there is nothing extra you have to do to accommodate this change.
In each end of the fence is an open plug and a closed plug. The open plug accepts a vacuum attachment that is 1 1/4" and adapts to any standard shop vac while the closed plug closes off the opposite end of the open plug. It's that simple.
Being the inquisitor/tinkerer that I am, I was not satisfied with merely using this for it's intended purpose, which in this case was the TS. I thought that if the VUF worked here, why wouldn't it work in other operations as well? So, I tried it out on the drill press.
I placed the VUF on my auxiliary drill press table and ran it through the paces that I did on the TS. The results were similar whereby fancy clamping wasn't necessary to hold difficult pieces.
The router table proved to be an impossibility in using the VUF in it's current configuration. Since the tunnel's are linear to it's entire length and the holes are drilled approximately in the center of the length of the VUF, I was unable to keep the bit in the center of the vacuum holes in order to have the material being worked to be securely held on both sides of the bit. Perhaps this is something that could be looked at when further improvements are made on the system.
Overall
For me, a respectful user of the Biesemeyer fence, I could not
bring myself to violate the integrity of my fence by drilling
holes in it. Call me anal if you will, but that's the way
I am. On the other hand, it didn't stop me from deciding
to build a fence, based upon the Biesemeyer principle, to accommodate
the VUF. This fence will have all the amenities of the
Biesemeyer but also those of the VUF so that I'm capable of switching
between the two as the need arises. Having said that, I
can state that this fence, adapted to any table saw, will perform
some pretty good magic. However, just like anything else,
in order to use this nifty little gadget, it will take some practice
getting used to it and, of course, some additional assets...namely
a dedicated vacuum cleaner.
The vacuum cleaner needed is at least a 4 to 5 HP with 120 CFM. Usually, this is not too much of a concern since most of us have this already, but for the weekender, this may prove to be a hardship in that you may have one of lesser capacities. In retrospect, the weekender has as much to gain from the VUF as any other level of woodworker; namely in safety and quality of cut.
It would be difficult to state emphatically that this accessory would be your answer to all your table saw problems, but it's easy to say that the VUF can handle some of the more difficult ones. Case in point; I noticed while viewing the video that the inventor utilized a zero clearance insert during the entire demonstration without so much as a mention to it's effectiveness in relation to the VUF.
Obviously, without the ZC insert and while using the VUF, cutting 1/16" x 1/16" strips would be impossible because the blade would pull the strip down past the blade regardless of the vacuum being present. So, this, too, has to be considered although it isn't addressed in any of the documentation.
Another consideration here is that the VUF performs remarkably well during abnormal cutting procedures but is it really necessary for general cutting? Sure, it holds the work piece securely to the fence but I've never had much of a problem doing so without it, however with it, the task is made easier.
There is no doubt that the documentation for the VUF will have to improve and most likely different models for the different fences will have to be introduced - at least a helpful suggestion on how to adapt it to an existing fence should be considered.
Using of a VUF will not eliminate the necessity or practicality of having an out feed table simply because it is not capable of holding up the longer material as it passes over the tabletop. So, used in conjunction, the pair make a pretty good team. It is a worthy accessory but the decision on whether your shop can't live without will have to be made. On a 1 to 5 scale, I rate it as a high 3 in terms of usefulness, a 2 on ease of adaptation, a 1 on instruction clarity and a 3 on price vs. what you get.
Joe Johns