
The WWA Shelf Pin Jig - by Jim Mattson
 If
you never build large cabinets or bookcases with adjustable shelf
pin holes, hit your back button now - there isn't much here you
will find interesting. If you do build such cabinets, you rightly
know that drilling shelf pin holes, sometimes hundreds at a time,
is the most tedious job in the woodshop. This article is for
you.
Several months ago I had the dis-pleasure to spend more than a day drilling several hundred shelf pin holes. Actually it was more than 1800 for a large built-in. All the time, while my wrist ached from holding the drill, I wondered what other alternatives I could find to make this chore easier.
That night I posted my angst to the Info Exchange while asking for ideas to help improve my methods. What ensued was an informal collaboration of sorts, with dozens of suggestions freely forthcoming. From this loose association, impossible before the Internet came along, arose a different way to tackle this job. I guess this is why we'll call this new method the "WWA Shelf Pin Jig". It is really the product of many minds.
This jig is unusual in that's it's pretty easy for any woodworker to make, it allows you to drill two rows of pin holes with one setup, it doesn't cost very much money and finally - it's FAST! After you understand how it works, nearly anyone can drill a hundred holes in under five minutes. Using a router with it's higher speeds, the holes are cleaner - even in melamine! And unlike most setups where you're required to lift the tool between holes, this method lets you lean on the tool instead - nice!
The Basics - For the Beginners in
the Crowd
We want these columns of holes to be far enough from the cabinet's
front edge so the shelf pins aren't too obvious and we want them
far enough from the back edge so the screws fastening the cabinet
back don't accidentally find a hole. Of course, this has never
happened to me...:)
It's sometimes desirable to vary the distances from the front and back edges so holes bored into opposite sides of the same panel don't intersect and form a through hole. This is particularly unwanted when one half of a cabinet is lighted and the other isn't.
Typical hole spacing in each column can be anything from 1" to 2" with 1 1/4" (32mm) the industry standard. It's not that important that each hole be exactly the same distance from one another but it is critical they be in the same plane as their counterparts on the same level. Without this consistency the shelf will rock.
The traditional method for the home craftsperson is to use a tool-guiding jig or pegboard template with a drill or router. Some of these jigs are expensive, some are short-lived, some are really slow and all require you to either hold the tool for extended lengths of time or pick it up once for every hole you drill. The WWA Jig isn't like that.
Half-Holes to Precision
 The
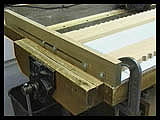
jig is really very simple and only has two kinds of main parts
- two templates which locate the pin holes and two end rails
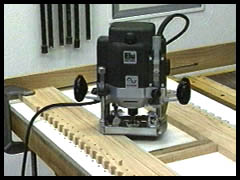
which secure and space the templates. From the picture at left,
you see one template (the near one) is fixed and the other template
is adjustable to accommodate different width panels. The capacity
of this jig handles verticals 11" to 25" wide.
In use, the panel getting the shelf holes (white melamine in this picture) is laid face up on your bench and the jig placed on top. The end rails hang down a bit and one of the end rails is butted to the bottom or top edge of the panel. The end rails also hang out on the sides to locate the distance of the holes from the panel edge. When you have it positioned where you want it, clamp it down.
 The router
is outfitted with a guide bushing which fits in the recesses
of the half-holes ('dimples') much the same way these bushings
work when used between the fingers of a half-blind dovetail jig.
Only in this case, lifting the router does no damage - the jig
is almost impossible to mar.
Another thing you will notice is the bushing doesn't fit all the way into the dimple. This is on purpose and designed so the 13/16" bushing only touches the 3/4" hole side at the two front points, leaving little or no chance that dust and chips can interfere with precise positioning.
 For my jig,
I used a 5mm, brad-point carbide 'drill' bit mounted in
the router. With the bit's 10mm shank, getting it adapted to
the router wasn't easy. The 5mm 'router' bits bought for
this project created a hole too sloppy for my preferred shelf
pins. Perhaps a 3/16" router bit would fit better. As I
understand it, 1/4" spiral bits work well for the larger
shelf pins.
As a precaution, make sure you have a properly-sized bit to match the diameter of your shelf pins before building the jig. If you have a problem getting a bit the right size, send your favorite router bit manufacturer an email with the URL for this article. Maybe someone will embrace this new technique as an opportunity to design a special bit for this application. Stranger things have happened! :)
Material List For My Jig:
2)
Oak template blanks 98" x 4 1/4" x 3/4"
2) Oak end rails 32" x 3" x 1"
1) Oak anti-tip block 4" x 1 17/32" x 3/4"
1) Oak template spacer (length variable)
1) Brass rod 1/4"D x 1 1/2"
8) Lag Bolts 2 1/2" x 3/8" (with washers)
Building the Jig - Step By Step
My jig is made of oak but you could really use any wood or composite
material depending on how much wear you expect it to receive.
If you choose solid wood, it's probably best to 'Not' follow
my lead when I used one single board to make both templates.
A better method is to prepare two separate boards and then edge-glue
them together. That way you won't run the risk of your board
warping when you rip it to create the half-holes.
The length of the jig can be virtually anything you want. I made my templates 98" to easily handle 8' panels. If you've never built a bookcase that tall and don't plan to, a shorter jig will work fine.
 After the glue
sets on the edge-glued template blanks, trim both ends at least
as square as you usually cut your cabinet parts. Then scribe
a line down the middle with a marking gauge. It's along this
line you'll lay out the distance between your holes. (Photo Left)
At this point you can be creative and space your holes anyway you like. I chose to lay out my holes every 1 1/4" but anything is OK. I've seen some very creative vertical hole patterns with some holes obviously closer than others; it really doesn't matter as they will still line up fine with the other holes on their level. It should be noted, however, that you'll be able to get a more intuitive feel for the process and faster drilling if you space your holes equally.
I also started my holes 6" from the bottom end of the template and stopped them about 6" from the other end. I don't like the look of shelf pin holes which go all the way to the bottom or top of a cabinet. In my mind there is no better way to say this cabinet is 'factory made by a machine'.
 From here it's
on to the drill press. Set up a fence to get your drill bit centered
over your scribe line. For really long rails like mine, you might
need an auxiliary table or props to keep the board manageable
on a small drill press table.
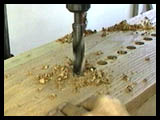
The best drill bit for this kind of work is a brad-point. With it's pointed center spur, it's easy to drop the bit right on target. For a hole this size - 3/4" - set your spindle speed on the lower end of the scale and frequently clear away chips so they don't work their way between the wood and fence.
 The next step
is to rip the glued templates down the center of your row of
holes. It's not necessary you rip it exactly in the center. The
beauty of this jig is how foolproof is it's alignment. Even if
you ripped one side larger than the other, the router bushing
will still seat into the dimple the proper distance from the
end of the jig. (As long as you don't turn your router around
- more later)
After ripping, the two pieces are swapped
side to side so the dimples are on the outside of the assembly.
Be sure to mark one end for referencing later before you cut
your template in half. If you get the halves mixed up during
assembly, all bets are off...:)
Building the jig is continued on page two of this article.